how to make long centerpieces
To learn how to make long centerpieces, you could ask five different florists and they will probably give you five different answers. There are many floral product choices and choosing the right one depends on your budget and how long your designs need to be.
Always begin by measuring your tables. You need to figure out exactly how long your centerpieces need to be and whether you want to put breaks in between (such as spaces for candelabra, square vases or pillar candles) or whether you want them to curve down the table. On the other hand, you also have to consider that shorter centerpieces, put end to end, are easier to transport.
The next most challenging is figuring out how many flowers you need. Obviously the cost is directly related to what flower choices you make. For example, you could use either white daisies or white dendrobium orchids. Both are approximately the same size flower head, but a white dendrobium raquette will cost you considerably more than the white daisy raquette.
I'm going to try to give you some guidelines on achieving the look you desire and the number of stems you will need. The final cost, however, will be dictated by the flower varieties that you choose.
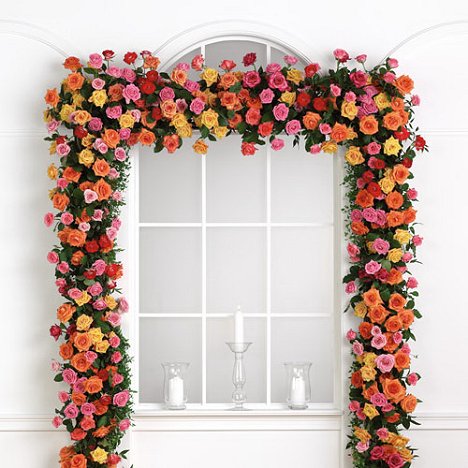
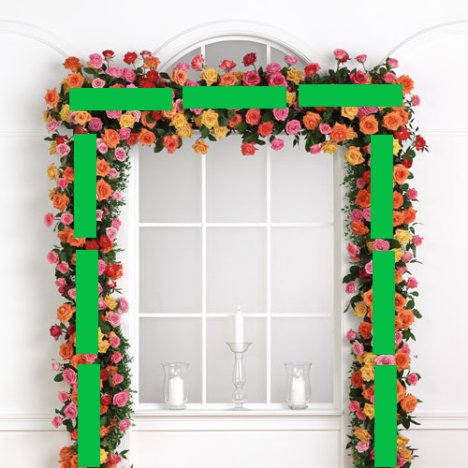
Whether on a table or used as an arch, let's examine the look of massed flowers. Beginners in the floral industry are usually startled to find out how many stems a closely massed flower arrangement has. This is one of the best examples, using standard roses.
The first and easiest product to make long centerpieces is Oasis Raquettes and the 12" Spray Bars. The raquettes come in lengths of 18", 27" and 36". I generally call them "soak and poke" - because that's all the skill needed (plus a sharp florist knife).
These are long bricks of Oasis Max-Life foam and are wrapped in a dark green polyfilm, perforated with tiny holes so that the foam can absorb water. It has a built in water tray, so be sure that it is on the bottom of your design so the correct side lays on the table top and protects the cloth underneath. Placed end to end, these can make long unbroken pieces that look like one continuous line. They are not the best choice, however, if you want the arrangement to spill over the table ends in a garland type effect.
Here is an example of raquettes above when placed close together to look like one continuous arrangement. Although it is a hanging arrangement, imagine that it is one continuous arrangement on top of a banquet table.
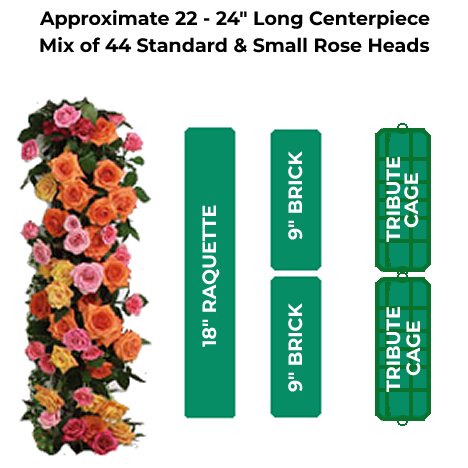
This massed arrangement uses nine 18" raquettes. Before adding the roses, four Smilex garlands are pinned to the raquettes, so you can assume that these arrangements are greened in. This means that the foam is covered with a base of greenery versus the "no greens" look which is just massed flowers. That usually dictates a tighter packed arrangement to ensure that the mechanics of the piece is completely concealed. I usually recommend that at the very least you green in with Leather Leaf fern so that you won't fear not having enough flowers to conceal the raquettes, as this affordable greenery will cover the mechanics for you.
This design has 388 roses! That means for every 18" Oasis Raquette, you will need approximately 44 roses (and greenery) to achieve the same look. One standard bunch of roses is 25, so the design arch below needed 15 1/2 bunches of roses.
Let's now compare the choices of 18" Raquettes or 2 Standard Bricks or 2 Tribute Cages shown in the photo below.
All three of these Oasis foam options have the same amount of foam and will yield approximately the same length centerpiece (if spaced and flowered to similar look as below). Keep in mind you can substitute different flower varieties or use less flowers to save on the overall cost.
For a more open, luxurious look (like the edge of a bridal table) space the flowers apart with a variety of longer and shorter stems to create depth and longer arrangements. For spaces that are tight (such as the center of banquet tables that need room for place, cutlery and glasses) keep the flower stems shorter and more massed onto the foam.
Keep in mind that the longer Raquettes can be purchased, just adjust the flowers accordingly. Two 18" raquettes or 4 standard bricks are equal to one 36" Raquette. You would have to double the amount of flowers needed.
What if you don't want just roses? Then you have to think flower head sizes in comparison and substitute. For instance, you can use one Hydrangea for every 3 roses. If you wanted to add in 10 hydrangeas - just subtract 30 roses from the total above since one hydrangea will cover the same space as 3 roses.
Here are some approximations for the longer raquettes. Just remember to wrap waterproof tape around each raquette in a grid pattern. The longer the arrangement, you have to take care to give it extra support during delivery. Flower designs like these are very heavy and can bend and break if handled carelessly during transport. Roses and wet foam are very heavy and wrapping a grid support around the foam before inserting the stems can give you more peace of mind.
36" (3 ft) Raquette - $$$ Massed Flower Look:
You need the following stems of flowers:
- 10 Extra-Large Headed Flowers (Hydrangeas, Sunflowers, Oriental Lilies)
- 12 Large Headed Flowers (Peonies, Garden Roses,
- 12 stems Medium Headed Stems (alstroemeria, standard roses, lisianthus, Spray roses, Mini Carns, Berries, or Filler Flowers (Limonium, Spray Asters , Baby's Breath, )
- 10 Stems Decorative Greenery (Dusty Miller, Salal Tips, Variegated Pittosporum)
36" (3 ft) Raquette - $$ Greenery & Flowers Look
- 27 Medium Headed Flowers
- 12 stems Spray Flowers
- 2 stems Filler Flowers
- 15 stems Greenery or a ready made Greenery Garland
36" (3ft) Raquette Mostly Mixed Greenery & Lower Price Flowers
- 18 Medium Headed Flowers
- 9 stems Spray Flowers
- 2 Stems Filler Flowers
- 15 stems Mixed Greenery
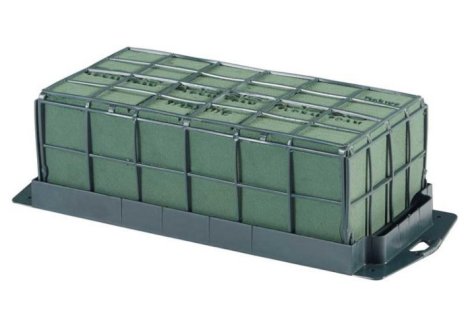
Tribute cages are a full brick of Oasis foam. Covered with a strong grid of plastic, there is no need to tape extra support for heavy or thick flower stems.
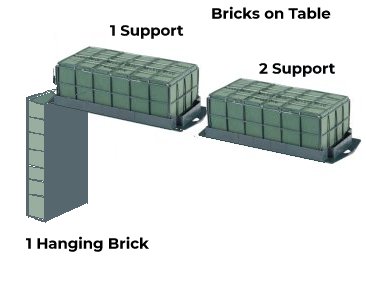
The tribute cage (as well as the Oasis Jumbo Cages) have tabs on each end with a convenient hole to connect the cages together with either florist wire or chenille stems. When linked together, there has to be enough cages (2 for every one) to support the weight of one of the cages draping over the table edge.
This means you must have two filled cages, wet and filled with flowers, to support one cage (wet and filled with flowers) hanging over the table edge.
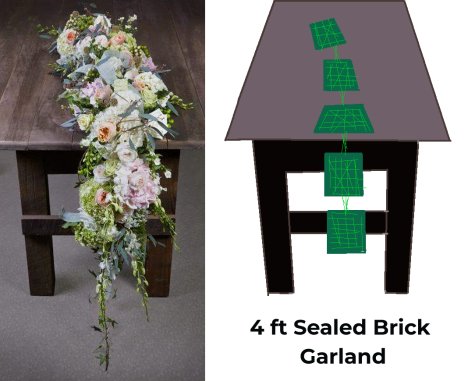
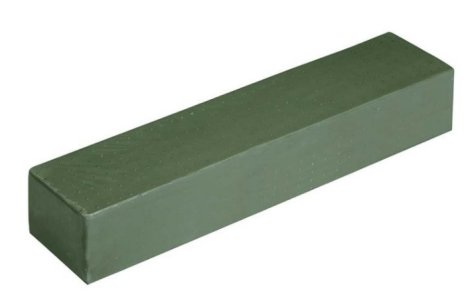
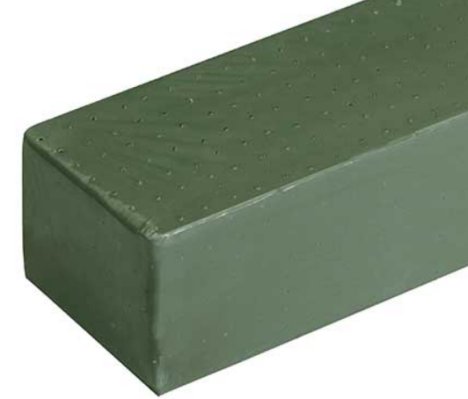
The Oasis Sealed Brick garlands are a newer product from Oasis. These convenient bricks of foam have a firm base for lying flat on a table and a strong netting over the foam for additional support. As shown below, each sealed brick is 5.5"L x 4" W x 2" H for a total length of 4' . These are great for long arrangements down the center or edge of tables with a cascade of flowers over the end of the table. From brick to brick (for the massed look) lengthen the flower stem for an unbroken arrangement on both ends of each brick.
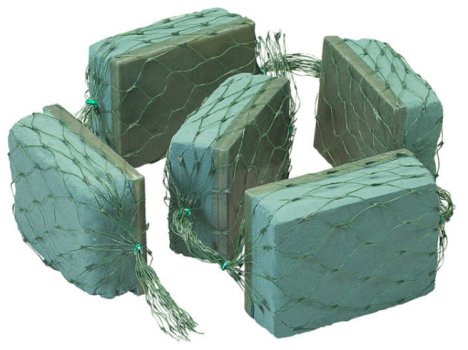
Sealed brick garlands are perfect for table garlands that weave around candles, candelabras or other table accents. Available in 4 foot lengths, you'll love the flexible design options you have with this new product.
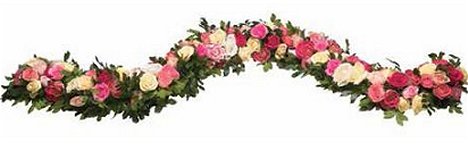
The sealed brick garlands also work for dropping over the table edge. Just make sure you have enough weight on the table to support the flowers and wet foam draping off the surface edge.