wedding canopy decorations
The wedding canopy (or chuppah) decorations you see featured in my Outdoor Wedding section are often made with artificial flowers, as the same designs in fresh can be very pricey, are heavy to hang and can take considerable time to construct. However, with a little ingenuity and foresight, you can have a gorgeous display that is stunning, but can be done ahead of time with much less cost.
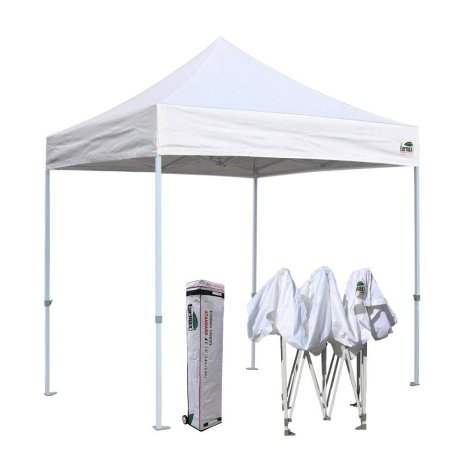
Everything starts with the actual buying (or rental) of the wedding canopy or chuppah. To find a rental in your area, search for "wedding rentals" and then add the name of your city and state. If you plan on renting, be advised that you reserve it EARLY! Sometimes waiting even six months ahead of time is cutting it too close. Since the average cost of renting starts around $250. For that kind of money, you may consider buying your own chuppah or canopy and selling it after the ceremony to recoup some of your costs.
This 8' x 8' Canopy (without side walls) is the kind you want to consider if buying your own. I strongly suggest you also buy some canopy weight anchors as well, in case the day turns out to be windy. I like this canopy for it's size, and because you aren't paying for canvas walls that you won't need. It is fairly simple to assemble. Even though it says it can be put up by one person, I would advise no less than two people!
Notice the legs are straight, rather than splayed out.
To create a wooden framework that supports your flower header for the above canopy, you'll need the following supplies:
- 3 8 foot 1" x 4" Furring Strips (to create 2 box frames 1" x 4 ft in length)
- Lightweight Screws or Nails (Screws preferred)
- Stubby Claw Hammer
- Gorilla Wood Glue
- Wood Staple Gun w/Staples OR
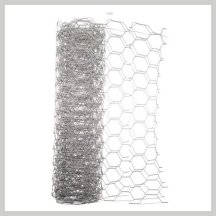
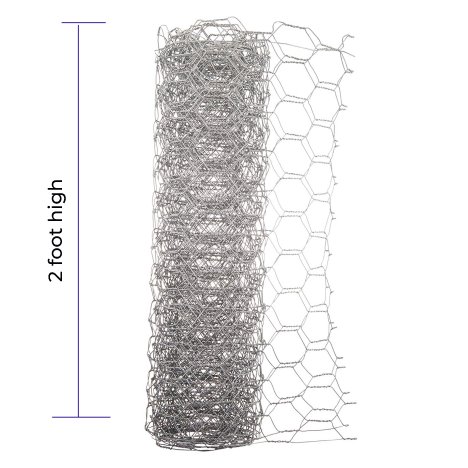
- 1' x 4' Galvanized Chicken Wire
- Heavy Metal Cutters
- Protective Work Gloves
Do choose good metal cutters. The ones above are more than wire cutters and can handle the tough chicken wire. You'll also find these handy for cutting thick stems of artificial flowers.
For making a basic wood frame, check out this video tutorial. Keep in mind, however, that your boards are not 2" x 4" as shown, but a lightweight 1" x 4". Therefore your nails and/or screws need to be at least 2" long - but lightweight so not to split the wood.
Lightweight 1" x 4" furring strips don't have to be perfect, but the 4" wood frame depth will hide the stems of the flowers that will be inserted into the framework. Galvanized chicken wire is tacked to the wooden framework to provide a grid support for the artificial flower stems.
If you search for "craft chicken wire", the 4" just isn't wide enough. I find that the 1 foot x 50 ft chicken wire works well without making you have to do a lot of cutting, without really paying much more in price. You will need heavy wire cutters, protective gloves, a carpenter's stapler, a tack hammer, lightweight nails and your boards cut to the needed lengths.
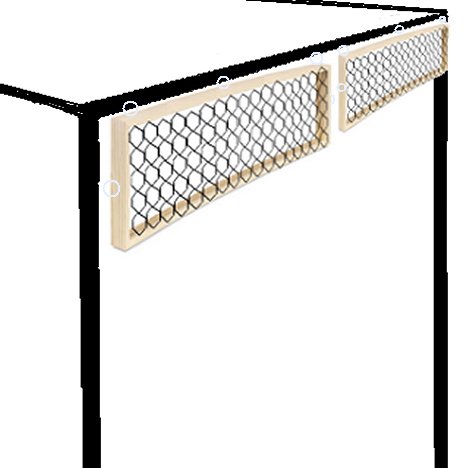
Measure the length you need. If you have an area longer than 4 feet, consider making more than one frame. The smaller sizes are easier to work with and definitely easier to deliver and assemble. They aren't going to be seen, so you don't have to worry about being perfect in your assembly or measurements.
The 1" x 4" boards (furring strips) come in 8 ft. lengths and can be obtained at a local lumber yard, such as Home Depot or Lowe's. Ask and they can usually cut the strips into the lengths that you need for your own project if you cannot cut them yourself. You will need approximately 10 feet of furring strip for each 4 foot frame. That will give you 4' x 1' rectangles that the 1' chicken wire fits on perfectly.
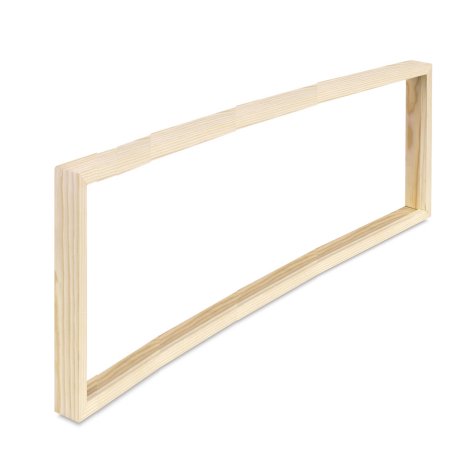
I find that creating 1 foot by 4 foot frames, and making at least two of them, give you a total length of 8 foot that works out really well. The chicken wire can be attached by using a heavy duty industrial stapler. Be sure to buy at least 2" staples to attach the wire to the frame.
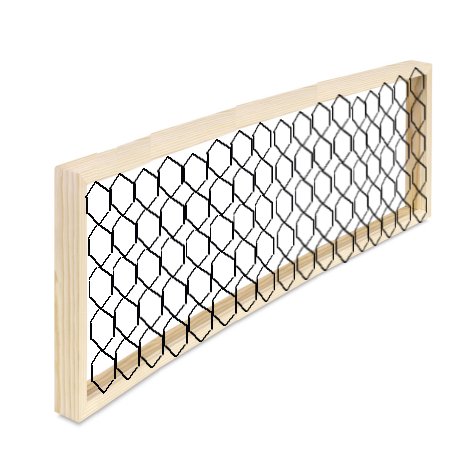
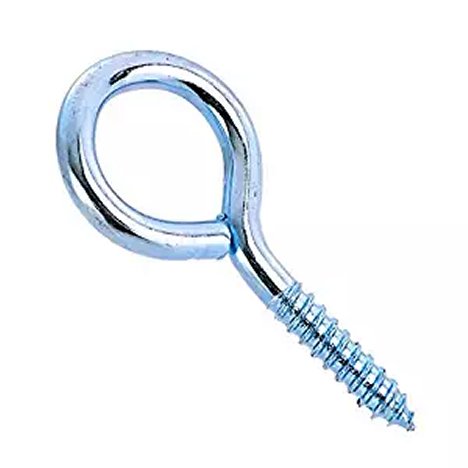
Insert at least 3 eye screws on the top of each frame. These are what you will use, along with paddle wire or zip ties, to attach the chicken wire frames to the canopy. It is advisable to put an eye screw at each end. This will give you a place to zip tie or wire the frameworks to each other and to the sides of the canopy.
Finally, I advise painting the frames a very dark green (chicken wire and all). Simply spray paint when all the chicken wire has been tacked to the wood. If you absolutely cannot build a wood frame yourself, you can get by with using just the chicken wire.
Buy the chicken wire in 2 foot width (instead of 1 foot).
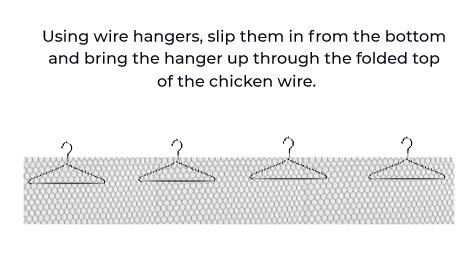
Roll it out to it's full length and then gently bend the top over, staggering the holes a bit.
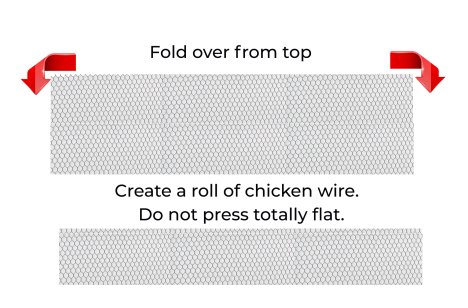
Slip wire hangers in from the open bottom of the wire. Work the hook part of the metal hanger through a hole in the top folded edge. Stagger out hangers as shown in the photo below.
Crimp the bottom edges of the chicken wire up. Be sure that all the sharp edges of wire, both on the bottom and and the two ends, are folded over. These wires can be extremely sharp!
You should end up with a lightly flattened roll of chicken wire that can be hung by the hangers. The hangers also give support to the easily bent wire. Use pliers to turn the neck of the hangers so they face backwards, allowing them to be hung on the canopy frame top poles.
I would advise the wooden framework, which can support more weight of the flowers without bending. However, creative thinking can get the job done in other ways! Chicken wire is fairly easy to bend and mold, creating twists around support poles, creating mounds inside large urns and serve as flower support in so many different ways.